Monday, December 16, 2013

Van Gogh Style Portraits


Vincent Van Gogh was famous for his self-portraits. We are thankful for that because now we can tell how he actually looked like in different times of his life. We had the kids paint their own self-portraits and have fun exploring their faces!
First we placed mirrors on the tables so they can see themselves as they are drawing,


Then we guided them through the drawing process.


Ask them questions - Where do you see you eyes? Do you have long or short hair?


Would you like to smile or be serious in your self-portrait?


Next class we had them paint their pictures. One of our kids decided to take it a step further and paint a portrait of his dad as well as Van Gogh painted a portrait of his friend the postman. And here are the results :-)


Tuesday, December 10, 2013

My Room - The Van Gogh Project

"Bedroom in Arles" is one of Van Gogh's famous paintings. Apparently he was a pretty messy guy (according to his friend Gauguin anyway) but he made sure he cleaned up his space before placing it forever on a canvas. 
Today the kids will create just the same painting. We had them each choose from which side they would like to portray their rooms and that is where they would sit and draw their sketches.


Next day they came to our studio and painted the rooms. It was quite darling to see the perspective with which they saw certain proportions or shapes.


Here are our final products together with Van Gogh's own.


Tuesday, December 3, 2013

The Starry Night Project

Our next artist is Vincent Van Gogh. Again, besides using Erica's resources, we came up with some extra activities for the kiddos to help them remember some famous paintings. Here is the famous Starry Night painting that we put a bit of a spin on...

You will need: 
card stock paper
black, yellow, white, and blue paint
paint brush
plastic forks

First have the kids use paint brushes and paint the bottom part of the painting. We used a painting in our book for the kids to see the details. Then, drip a big blob of yellow paint into the right corner and smaller blobs of white and blue along the top.


Then have kids use the fork to spread it around, swirl and twirl the paint just like this.


Everyone loved the effect and there is always certain excitement with using new things to create art with!


Our next Vincent Van Gogh project is coming up very shortly.

Tuesday, November 26, 2013

Jackson Pollock Resources

We would like to make your life easier and list some helpful resources on Jackson Pollock to make your learning fun.

Here are couple videos:

Art with Mati and Dada is really fun.
You can see some of his paintings by clicking here.

Here are some books we used for our study of his life and art:


Wednesday, November 20, 2013

Marble Art - Jackson Pollack Study


Get ready for some marble fun! This was a part of our Jackson Pollack's study. Not only were we using an unusual object to create art with, but also the final product resembled the artist's work

You will need:
deep tray
card stock paper
paint 
marbles

Ask the kids what colors they would like to use and place small dabs of paint on their paper. You don't want to use bigger amount only because it will be difficult for the marble to roll and it will be getting stuck everytime it will pass through the paint.


We used 3 marbles for each child. Have them pick up the tray and roll the marbles all over the paper back and forth and side to side. They had so much fun doing this they wanted to do more...

And here are our little Jackson Pollacks ;-)

Monday, November 18, 2013

Spoon Art - Painting the Pollack's Way


This was an easy one! We all know that Jackson Pollack used anything he could find around the kitchen to paint with. What did the kids find this time? Plastic spoons...

You will need:
card stock paper
plastic spoons
trays
paint diluted with water


Place the paper onto a tray and give your kids some paint diluted with water to run a bit easier.
Now just let them have fun swirling, twirling, and splashing the paint using their plastic spoons. Painting Pollack's style is always such a hit!


Friday, November 15, 2013

Action Jackson

The first artist in our study this year is Jackson Pollack. And what else would we start our lessons with but the action painting that Jackson Pollack is so famous for. 

You will need:
big paper
(we used two strips of paper that came with our easel. Next time I would go for sturdier paper or even giant canvas if that would be in your budget)
any kitchen utensils that you think would be fun to use 
cups
paint 
(we diluted regular washable paint with water but the artist used regular wall paint, so if you have some left over feel free to use that)
paint brushes


Be creative!


 Wish for good weather, because this is definitely an outside activity! Spread the paper on the ground and secure it with heavy objects on the edges. Let the kids have fun! They can pour, splash, sprinkle... but no actual painting allowed ;-)


 Be prepared for a whole lot of mess but even more fun!


Thursday, November 14, 2013

Famous Artists Study


We were looking into doing something different this year for our art class. We used to just do random art projects that the kids would pull out of our "Art Jar". That was fun and you can see our posts here.

This time, since the big kids entered 1st Grade, we decided to take it a step further and base our projects on famous artists. Some of you already know the lovely Erica over at the Confessions of a Homeschooler. Isn't she so unbelievably talented? 
Well, she put together a lesson plan called The World's Greatest Artists Volume 1 (yes, she also has volume 2) and that is what we purchased to guide us this year in our study. Besides using her puzzles, flashcards, and lap book printables, we also came up with our own art projects that one way or another went along with the featured artist's work. You can follow our journey post by post as it will unfold during the year.  We will include books, tips, and videos that you could use as an addition to the wonderful lesson unit Erica put together. We hope you enjoy it as much as we do!

Thursday, October 10, 2013

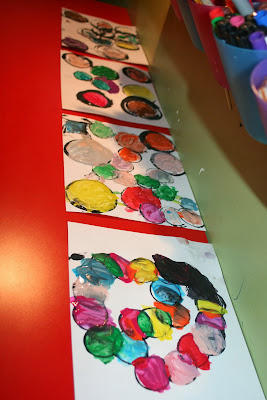
Circle Art

This is an easy art project for your kids to do! 


All you need is:

Paper (we use card stock)
cups various sizes (we also used cut toilet paper rolls)
paint
 and brushes


First squirt some black paint for the kids on a flat surface - we used paper plates, and give each child different cups. If you don't have enough, you can have kids switch the cups around. Then they will dip the edges into the paint and make a print on their paper.


Let the circles dry. Then kids can paint them. Make sure that the black paint dries because then if they smudge it it will mix with the colors and it will look a bit messy.


Look how fun they turned out!


Saturday, September 28, 2013

Another Halloween Party!

Here we go again... another year down and we are getting ready for this year's Halloween Party! Kids always have so much fun...

Here is the last year's Halloween Party to hopefully give you some fun ideas for your own!

Here are our costumes. Those are a must for fun Halloween parties. This year, kids requested face paint being part of their costume.


After we painted kids faces we read a Halloween story.


Next activity was Charlie Brown themed Domino.


Kids really laughed a lot during "Place the hat on Mr. Bones" game.  


We drew skeleton on our blackboard and we made sure that kids could reach the top. Then they each got a turn to try to pin the hat on that skeleton. But first we blindfolded them and spun them around! This was a hit!


As one of the crafts we made gauze toilet paper roll ghosts. All you need is toilet paper rolls, gauze and googly eyes. 


Take the roll and wrap it around in gauze. Glue it. Then glue the googly eyes and your new friend done!


Next we decorated a wooden mask that we bought for very cheap price in craft shop. Girl had a princess and boys had a pirate.


Here is the final product... with Mr. Bones :-)


Next we decorated real life small pumpkin using Mr. Potato Head pieces.


Super fun!


You might have to help them poke the holes so do that as you go... that way they can tell you where they want the hole to be. 


And here come the playdough monsters. All you need is playdough, pipe cleaners and other craft supplies that could be used to create a monster. We used googly eyes and  buttons. Kids should press the decorations into the playdogh and let it dry for couple days. Then you can exhibit it...


For lunch we had mummies. Small croissants with hot dogs inside.


They turned out awesome! Again, another hit with the kids...


And how can there be a party without something sweet! We made cupcakes the night before...


... and kids decorated it!


Saturday, May 18, 2013

Sparkly Sea Shells

The kids were watching Team Umizoomi and one of the episodes had a girl who lost her sparkly sea shells and the team was helping her find them. That sparked an idea in them and they were asking for days to make them! Finally we found some time!

What you will need:
glitter
sea shells
glue
paint brush
newspaper


After the kids picked their sea shells, they spread the glue all over them using paint brush.


Then the simply sprinkled the glitter on top of the glue.


These turned out so cute! I love when they come up with their own projects... saves me time fro planning and they are that much more enthusiastic about it!


Wednesday, May 8, 2013

Paper Roller Coasters

When we were putting together this activity for the kids we had no idea it will be such a hit. They basically make their own roller coasters out of paper strips and give them their own unique name.


 We cut some strips of construction paper in many different colors, as our kids love to make everything "rainbow" and we gave them some glue and black paper.


They made lines on each strip just like roller coasters have and glued them in many different ways on their black paper.


They made many different roller coaster models you wouldn't believe. It was such a great team work as well - they dove right in it the next day during their play date and created multi-paper model. (not pictured but I should take a picture of that... I know)


We found this idea over at 1+1+1=1